This is the top of the main content
Onboarding Users
Steps to perform to onboard to the Register of Radio Frequencies (RRF) for new and existing users.
On this page
Before you can use the new Register of Radio Frequencies (RRF) for the first time, you need to complete the onboarding process.
Note: You must have a RealMe login before you can complete onboarding.
Onboarding - Existing user
Existing users need to onboard to the new RRF to move their credentials from the old system.
The new RRF uses RealMe as your login. This allows you to login once without having to login again to access the RRF using different roles, (e.g. a client, an engineer, or an engineer acting on behalf of a client).
The different profiles and roles you have are based on your email address and they are grouped per single email address. If you had multiple email addresses and logins in the old system, these can also be migrated over at the same time or later once you have completed your initial onboarding.
Steps to onboard an existing user
Follow these steps to migrate your existing records and any of your client records to the new RRF.
- Click the activation link in the email received to go to the RRF landing page.
- Login using your RealMe login. Refer to Login to the RRF. The ‘Onboarding’ screen displays.
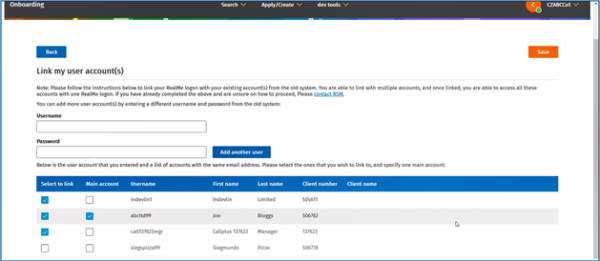
- Click Link my user account to begin linking your accounts.
- Enter the Username and Password of the account (or one of the accounts) you used in the old system.
- Click Add User. The list of accounts with the same email address displays below.
- Click the check box in the Select to Link column for each listed account you want linked.
Note: Any account left unchecked will not be linked to your main account. - Click the Main Account check box next to the account you want as your main account, (e.g. the account you logged in as). This will be your default profile and can be changed later if required.

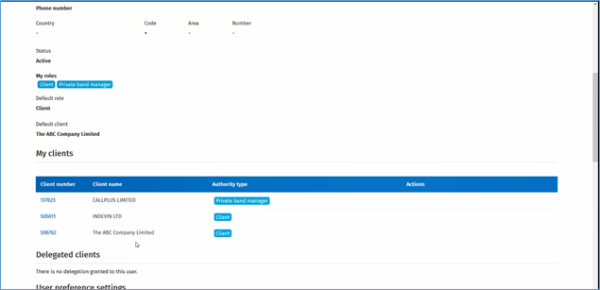
- Click Save. RRF links the selected account(s) from the old system to your new account and displays your user account details, (i.e. as the Main account) in the ‘My User Account’ screen.
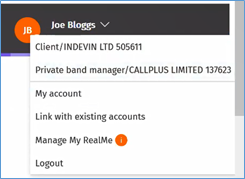
- The top right of the screen displays your user account name and the role you logged in as. To change your role (and profile), Refer to Changing Roles
- Click your account name or role to see any other accounts you have access to, your role for each account and other options, including Link with existing account where you can like other accounts you manage. Refer to Link additional accounts to my account

- Scroll down the ‘My User Account’ screen to view your account information, including My roles and My Clients where all the accounts you linked are listed.

- If you need to edit your details, Refer to Update your client detail
Link Additional Accounts to my Account
After initially linking existing user accounts from the old system to your new RRF account you can add additional accounts at any time. These accounts can have the same email address (if you still have unlinked accounts from an address) or from a different email address you used in the old system.
- Click your name or role in the top right of the screen and select Link with existing accounts. The ‘Onboarding’ screen displays.
- Enter the Username and Password of the account you used in the old system.
Note: This can be the same address or a different address you used in the old system. - Click Add User.
The Main Account check box will default to the account you previously selected. - Click the check box in the Select to Link column for each account you want linked to your main account.
Note: If you leave an account unticked it will not be linked to your main account. - Click Save. RRF links the selected account(s) from the old system to your new account and displays your user account details in the ‘My User Account’ screen.
- If required, scroll down the screen to view details of the new accounts added.
- Click your account name or role in the top right of the screen to view the additional account(s) that have been linked and your role for each account. Refer to Changing roles
Onboarding - New user registration
If you have never had a login to the old system and you need to interact with the Register of Radio Frequencies (RRF), you can register as a new client, (e.g. you have a callsign, need to use an API).
Once submitted, your registration will be checked by the Licensing Team for approval, and you will receive an email with confirmation and instructions to access RRF.
Note: Before you can use the RRF you need to have a RealMe login account. Refer to realme.govt.nz(external link) to apply.
Register as a new client
- Go to the Radio Spectrum Management (RSM) website.
- Click the Register of Radio Frequencies (RRF)(external link) link in the top right of the page.
- Login using your RealMe login. Refer to Login to the RRF. The ‘Onboarding’ screen displays.
- Click Register as a new Client. The ’Registration New Client’ screen displays.
- Select the reason Why you want to be a client in Register of Radio Frequencies (RRF) from the drop down list.
- Select the Client type from the drop down list.
- Enter your details in the fields that display. You must complete all mandatory fields which are marked with a red asterisk (*).
- If you have an the NZBN, start typing the name in the NZBN field then select the name from the list that displays. The registered name also displays in the Billing field.
- Enter the Billing name. If populated from the NZBN, amend the name, if required.
- Select the Default billing month you require.
- Enter the Email address. This is where the email will be sent to you giving access to RRF.
- Enter your phone number. To record a second number, click Add.
- Record your addresses.
- Start entering the Residential/Physical address and select the address from the list to populate the field. (This uses NZ Post data).
- If the address was populated by NZBN, check the information displays in the correct fields, (e.g. post code) and amend if required.
- Enter your Billing and Registered addresses or tick the check box if the same as your Residential address.
- Click Submit. You are taken to the ‘My Dashboard’ screen.
- A message displays at the top of the screen to advise it has been submitted. You will receive an email advising your client record has been sent to the Licencing Team for approval.
- When you receive the approval email, go to Activate your new account
Activate your new account
Once the Licensing Team has verified and approved your client record, you will receive an email with an activation code and instructions to access RFF.
- Click the activation code link in the email to take you to the RRF landing page.
- Login using your RealMe login. The ‘My Dashboard’ screen displays with any alerts or tasks assigned to you.
- Access the information you require in the RRF, for example:
- Perform searches. Refer to Search the register of Radio Frequencies
- View or update your client record. Refer to Update your client record
- Logout when finished.
Training video: Creating a client
Explains how to create a client, register as new client and client types.

